We know that many times you find the courses and the groups within
them repetitive. So that you don’t have to re-set them every time, the
copy functionality is ready for you.
You can use copying at course and group level. When copying, you
always have the option to change the basic settings and also copy the
dates or registrations. You can use this functionality on any type of
course or group.
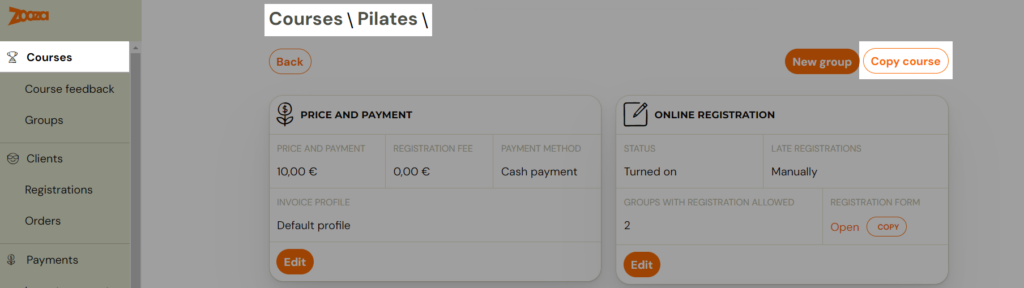
Copying course
To copy a course, do the following:
In the course overview, click on the “Copy” button next to the specific course you wish to copy
or after opening the course click on “Copy course”
Then customize the name and select the options to suit your needs.
You can create a a new course with similar settings by changing the name of the course
If the settings of extra fields and payment schedules are the same you can easily set them for a new course.
NOTE: The possibility to copy payment tamplates are only displayed if you are coping course with registration for the full course durantion and there are payment templates set.
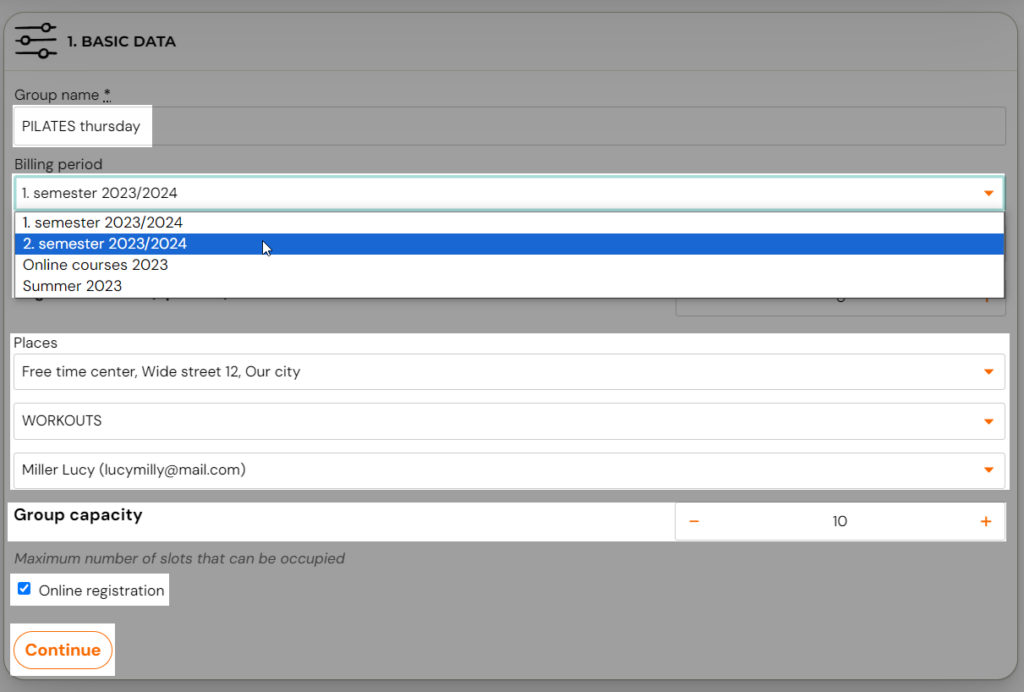
Copying groups
In order to copy a group, do the following:
in the selected group, click the “Copy” button.
Then edit and select options according to your needs. Edit the name
to a different one if you are copying a group to create a new one. Or
keep the original name (just remove the “Copy” text) and copy the same group to the next billing period
You may or may not change the Location, Lecturer, Group Capacity,
View in Online Registration, or Copy Payment Template Settings while
copying.
Next, you can decide if you want to copy the dates as well. You can
simply move them to a new first date, set a time change, or keep the
same time and the new dates are simply created with a few clicks. You
can also preview the new appointments and make sure everything is in
order.
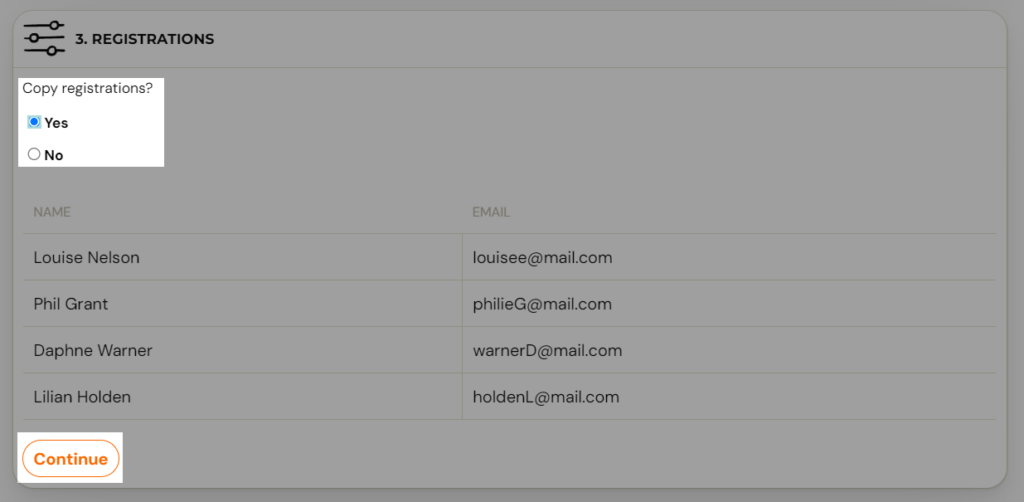
When copying, you can also decide if you wish to copy the
registrations along with the group. This is usually done when copying a
group that wants to continue more or less unchanged in the next billing
period. If someone chooses not to continue, you simply delete their
individual registration.
Note: If you will be copying registrations along
with the group, be aware that this is a copy not a transfer. This means
that no credits, compensatory hours or payments will be transferred to
registrations. Registrations will have a new registration number created
with completely clean credit and payment information. In case you need
to move a client to another group and want to keep the payment or credit
details, you need to use the Move Client functionality, which can be found in the registration details.
If you want to keep order between the courses provided or simply want to “delete” a course, use the course archiving function. You can hide older courses that you no longer have on offer so they don’t get in the way of your daily work. The archived ...
When you finish old courses/groups, you have many clients who want to continue with you. That’s why you start thinking about how to create new courses and how to transfer your client database. The app allows multiple ways you can do this for them or ...
Classes are used to divide the course into time periods and can possibly be further subdivided, for example by level or by location. Classes ensure that the next time you repeat a course, you don’t have to create a new course with all its settings ...
Each created date can be changed additionally - change the lecturer or time. Each term can be cancelled or deleted. To change a term you have several options on how to proceed: Bulk edit of events The quickest way to edit events is directly in the ...
Creating summer camps If you are creating an offer for summer camps for week-long camps, you will create the offer as follows: Create a new course, in the Courses section click on the New Course button and select Meetings Select the registration type ...

 or after opening the course click on “Copy course”