Entry pass creation

An entry pass is a pass that has a certain number of entries and the client is gradually counting down the entries by signing up for individual lessons/events.

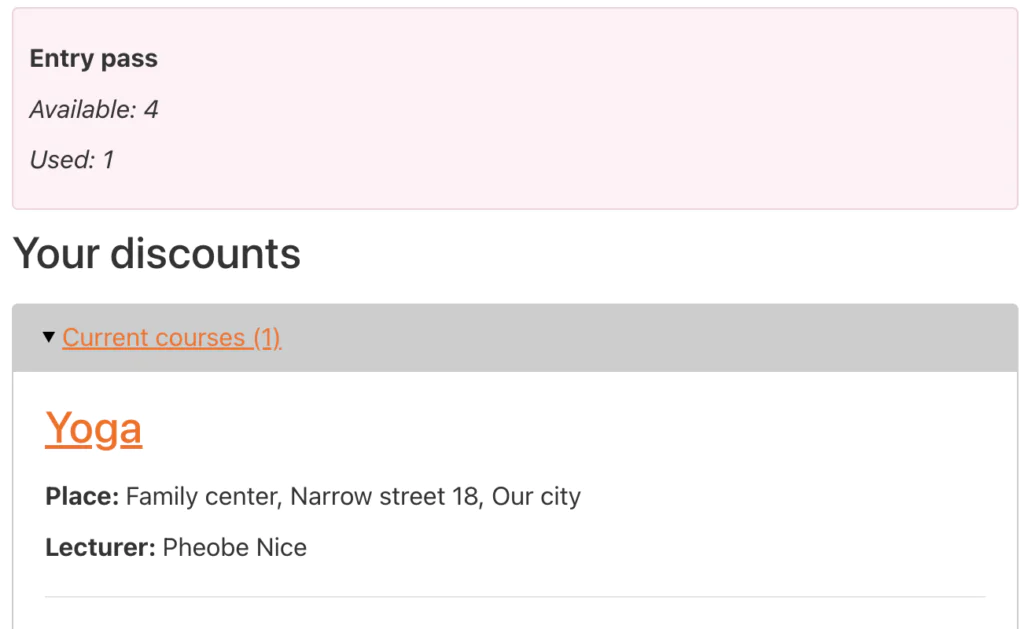
The client has an overview of the status of the entry pass right on the home page of his/her profile. More information about how the season pass is displayed in the client’s profile and how the client signs up for classes can be found HERE.
Entry pass creation
- In the Products section, click the Add New Product button.
- Select the menu type – Products. When selecting a product, click on Credits and select Entry pass. Continue.
- Write the name of the product. Leave the product price and prepaid credit value at 0, it is set in the next step.
- After saving and creating the product, click on Go to product to make additional settings.

In the product settings you can change the name, price of the product. You set the payment types, whether you allow the customer to pay online via payment gateways or in cash / simple transfer, or both.
- Important is the Items for sale section, where the number of entries and the expiration date of the pass are set. Click on the Add button
- Choose Entrance voucher
Here you set the number of entries, their expiration and price.
To confirm the listing of the item for sale, click the Start button and Continue
When you return to the product, you can give a more detailed description of the product, such as the terms of sale and so on. Also, select the notification template that will be sent to the client after purchasing the product. You can change the notification templates in the Communication – Message Templates section.
Assigning the product to a group

You need to assign the created product to the group in which you want to sell the pass
Once you have created the product(s), you can add them to your open course group(s) in addition to selling them via the sales form. They will be displayed in the client’s profile, where they can conveniently purchase it.
- Open the group you want to add the product to
- In the Products section, select Edit.
- A list of your products will open, select one or more types of passes (e.g. for 3 entries, for 5, for 10) by simply clicking on Add
- Click on Save under products and also at the bottom of the group settings
At the group level, you can make additional product settings (by clicking the Settings next to the product) regarding its display in the application components. Thus, you decide whether you want to offer the product for sale in the client’s profile or also in the registration form directly when registering for the course. And also the maximum number of product purchases per registration.
 Warning! At the moment the application does not allow to sell products at the same time in the registration form and client profile if the items are not marked as mandatory. Making it optional to purchase an item within a product will cause the registration form to not have to purchase an item from each product you set up in it. But they will not be able to purchase the optional product in the profile. Only products with a mandatory purchase can be offered in the profile.
In order to offer the product in both places you need to create two sets of passes, one which will be mandatory and only offered for sale in the client profile and the other which will only be offered for sale through the registration form. This setup restriction is temporary.
Purchase an entry pass
Registration form
The client can buy a pass directly in the registration form - when registering for an open course, this is possible immediately.
Client's profile
All the passes that you have added to the group that the client has signed up for will be displayed for the client to choose from and they can select which one suits them best.
Order form
If you have the widget for the sales form deployed, the client can purchase the entry pass directly here.
Manual assignment of an entry pass to a specific registration
You can also assign a pass to a registration on the client’s registration card. The condition is that the product is assigned to the group in which the client is registered.
After clicking on Buy, you will be shown the payment method and after selecting the payment method, you will also be able to check the checkbox – paid, if the client has already paid you.
You will see the payment method you have set in the product settings. If you do not see the desired payment method, return to the product settings and activate the desired payment method.
Displaying the entry pass at registration
When you purchase a pass, nothing changes on the registration, except for the assignment of the order. The payment as well as the individual entries of the pass are managed separately on the order. The client’s order can be accessed via the client’s registration or separately via the Orders.
Order detail, where you can also change individual entries from the pass:
How the client sees the pass in their profile can be found in a separate manual.
Related Articles
Credit voucher creation
We have described how and why credit passes work in the guide. Below we will explain how to set this up in the app. Click on Products on the left side of the screen and the Create New Product button Select Products – Credits – Credit Pass and click ...Entry pass in client's profile
An entry pass is a pass that has a certain number of entries and the client is gradually counting down the entries by signing up for individual lessons/events. How to make and set it up can be found in HERE Overview in profile The client has an ...How to use passes
Types of passes There are two types of passes in the app. Each of them has its own specificities and different possibilities of use. Choose which one suits you better. Credit passes Entry passes Credit passes How do credit passes work? The credit ...